Install Raspberry Pi 3.5” Touch Screen Driver for Raspbian Stretch
1 Install Raspbian OS in your Micro SD card
This tutorial is compatible f the OS: 2017-08-16-raspbian-stretch.img
1. Download Raspbian zip from website raspberry.org
2. Unzip Raspbian zip file
3. Prepare an newly formatted Micro SD memory card (TF card) with USB microSD card reader, recommend sizes are 8G, 16G, 32G
4. Burn the Raspbian image file to SD card
5. Inserting Micro SD card into Raspberry Pi
2 Download Rapberry Pi 3.5″ Touch LCD Diver
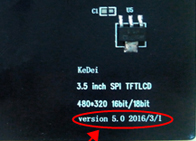
1. Download correct driver from this website to your computer. (Do not unzip). Please check the version information on the back of the screen to download the right driver as followed picture.

In my case it was: LCD_show_v6_1_3
2. Copy the driver (rar file) to another Micro SD card or USB disk
3 Connect Raspberry Pi to HDMI display (Mouse and keyboard are needed)
1. Inserting the Micro SD card or USB disk which contains driver (rar file) into Pi.
2. Copy the driver to /home/pi
3 .Input command: cd, click enter button
4. Input command: tar xzvf LCD*.tar.gz, click enter button to unzip the driver
5. Input command: cd LCD_show_v6_1_3, press enter button on keyboard
6. Input command: ./LCD35_v, press enter button
7. The raspberry Pi will reboot
4 You have done the installation, you should see the 3.5’’ LCD display come alive in a few seconds
5 Change 3.5’’ LCD display to HDMI display
1. Input command: cd LCD_show_v6_1_3, then press enter button
2. Input command: ./LCD_hdmi, press enter button
3. The raspberry will reboot.
4. Your HDMI should be display correctly
6 Change HDMI display to 3.5’’ LCD display
1. Input command: cd, press enter button
2. Input command: tar xzvf LCD*.tar.gz, press enter button
3. Input command: cd LCD_show_v6_1_3, press enter button
4. Input command: ./LCD35_v, press enter button
5. The raspberry will reboot
6. The 3.5’’ LCD display should come alive in a few seconds